Online
Docs : Render Effects Tab
By selecting different render effects
you can change how Fluid looks in dramatic ways. This is what makes
Fluid so customizable. Each of the effects is seperate from the others
and none are mutually exclusive. It's up to you to customize Fluid to
your tastes.
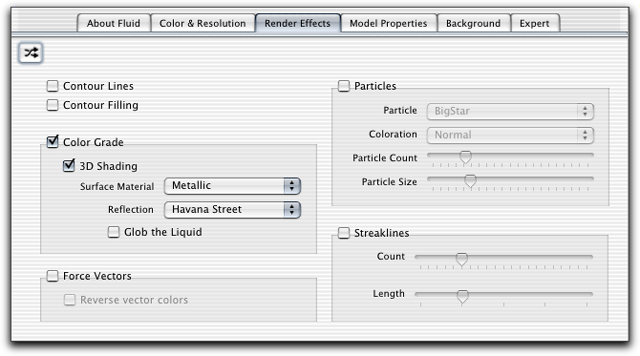
Contour Lines &
Contour Filling
These options allow the rendering of objects that are much like contour
lines on a topographic map. There will be a contour line for each color
handle that you have in your colormap (defined in the Color
& Resolution tab).
Color Grade
This is the most common type of render effect—and the one that
Fluid uses as a default. It colors the liquid medium per the velocity
at that pixel on the screen. You can also apply some additional effects
to the color grade option. First of all, you can shade it by selecting
the "3D Shading" option. This will create specular highlights
and shadows on the liquid to make it look more three dimensional. When
you enable shading you will have a selection of material types for the
liquid and an option for "globbing" the liquid. When globbing
is enabled the liquid will form in small clusters or nodules as it flows—much
like mercury does.
Surface Material
- Plastic – you won't see any reflections and
the highlights and shadows will be seem fairly smooth.
- Metallic – you will see reflections on the
liquid. The reflection map popup can now be used to select the image
that will appear in the reflections.
- Glassblocks – On some graphics cards (Radeon
8500) there will be an option for a glass-block material. This looks
best at resolution 64 and has a very nice effect. You will also be
able to select a reflection map when this is enabled.
Force Vectors
Force Vectors will render as small pointers at each of the model's grid
locations. The direction of the vector corresponds to the direction
of the liquid medium and the length and color of the vector correspond
to the velocity of the liquid at that point. You may choose to reverse
the colormap for the vectors to better see them against some color backgrounds
or if you have colorgrade effects turned on also.
Particles
Particles offer some very interesting effects for Fluid. At this point
we have a group of particle emitters in the center of the screen. These
emitters will constantly shoot out particles that will be swept up by
the current of the fluid and will be colored based on their age. The
Coloration popup menu allows you to change the way the particles are
composited over the background and can dramatically change the way a
particle system looks. The Particle Count slider gives control over
the number of particles that will be alive at any one time from each
emitter. Particle Size is quite self explanatory.
Streaklines
Streaklines are a close cousin of Force Vectors. The main difference
between the two is that streaks will stretch, flow, and bend with the
current, whereas vectors remain stationary. Also, you may include an
arbitrary amount of streaklines regardless of Fluid's grid resolution.
The amount of streaks is controlled with the Count slider. The maximum
length of the streaks is controlled by the Length slider.
Previous:
Color Tab | Online Docs Index | Next:
Model Properties Tab |